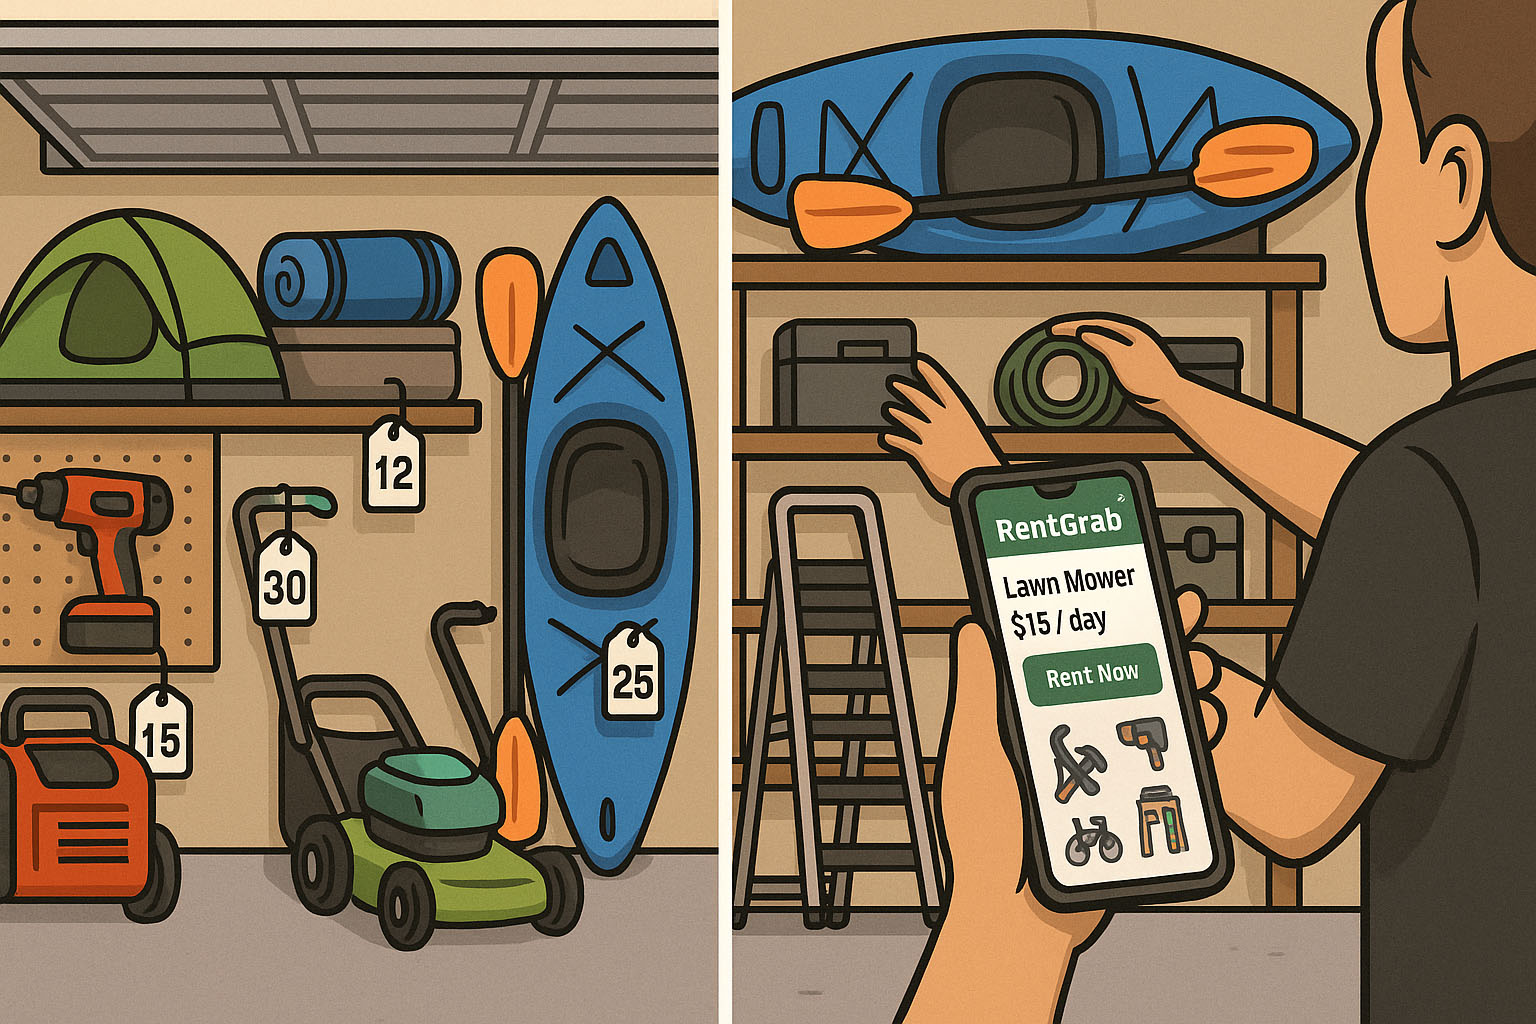
How to Add Your First Item to Rent on RentGrab
Congratulations on becoming a RentGrab owner! Now it’s time to create your first listing and start earning. This guide walks you through every step of adding an item or service, plus tips to help your listing stand out and get booked.
Before You Start
Make sure you have:
- A completed owner account with Stripe verification
- Clear, well-lit photos of your item (up to 10)
- Your pricing figured out (minimum $25/day or $25/hour)
- Your availability schedule in mind
The 6-Step Listing Wizard
RentGrab uses a simple wizard that guides you through creating your listing. You can save your progress and come back anytime—your listing stays in draft mode until you publish it.
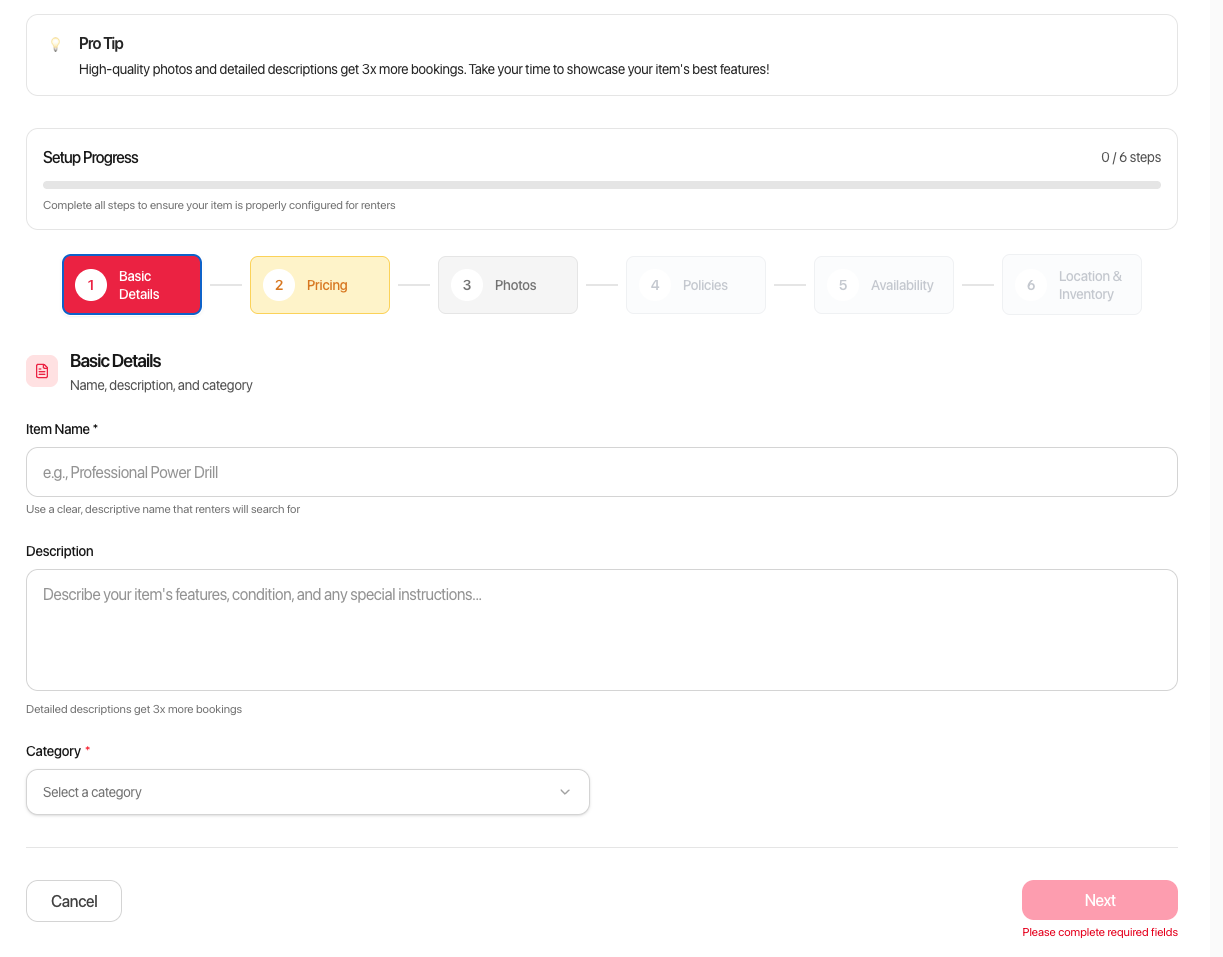
Step 1: Basic Details
This is where you describe what you’re renting.
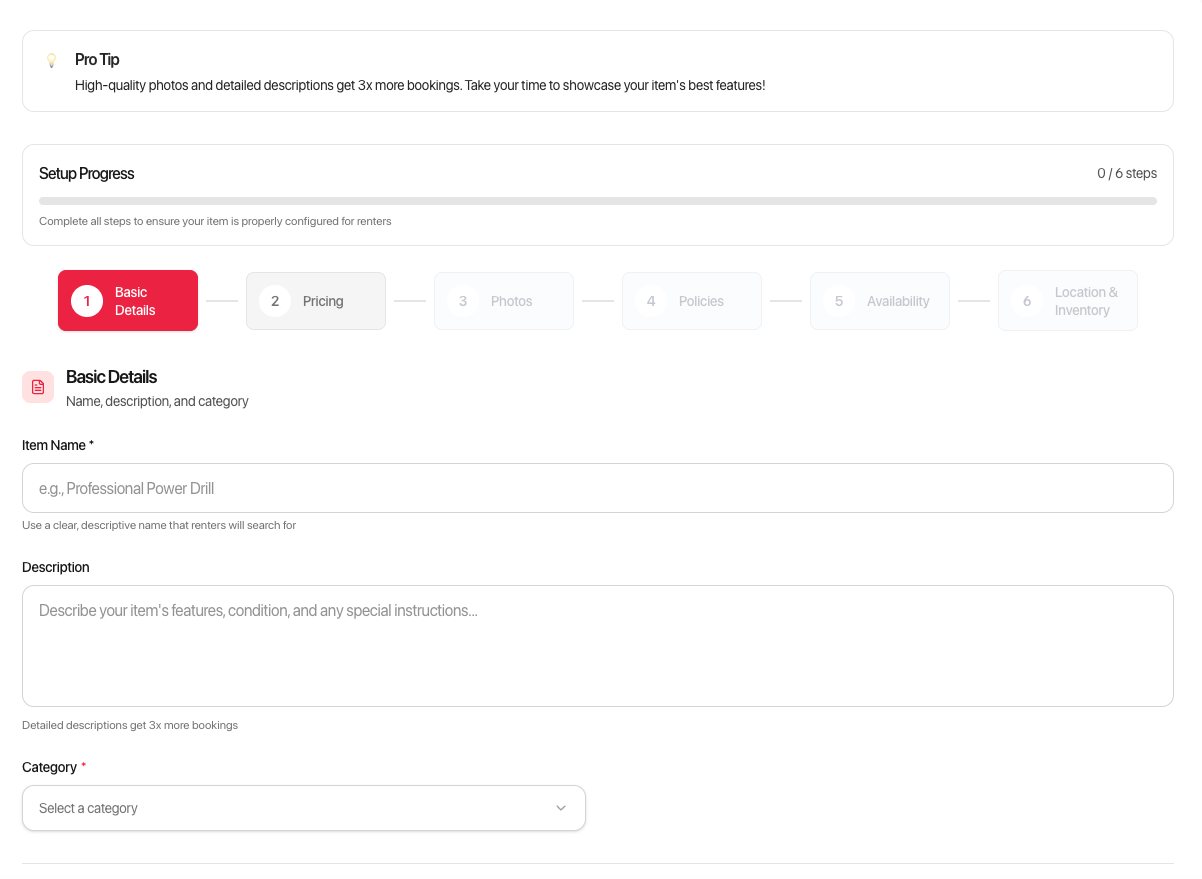
Item Name
Enter a clear, descriptive title for your item.
Tips for great titles:
- Be specific: “20ft Extension Ladder” is better than “Ladder”
- Include brand names for popular items: “DeWalt 12-inch Miter Saw”
- Mention key features: “4-Person Camping Tent with Rain Fly”
- Keep it under 100 characters
Category
Select the category that best represents your item.
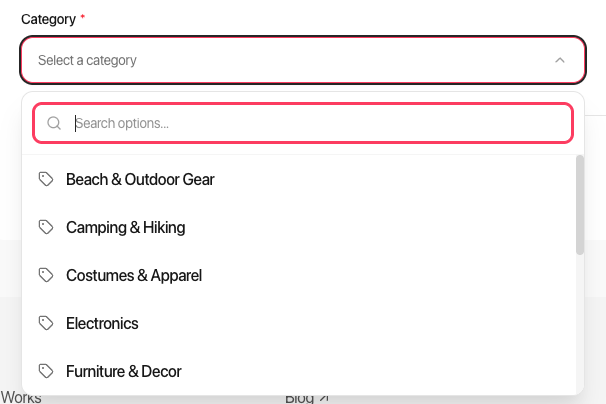
Tip: Choosing the right category helps renters find your item. If your item could fit multiple categories, pick the one where renters would most likely search.
Description
Write a detailed description of your item. This is your chance to sell renters on why they should book with you.
What to include:
- What the item is and what it’s used for
- Key features and specifications
- Condition and age
- What’s included (accessories, cases, chargers, etc.)
- Any requirements or restrictions
Example description:
Professional-grade DeWalt 12-inch sliding compound miter saw, perfect for woodworking projects, trim work, and DIY renovations. Features a powerful 15-amp motor, LED cut line indicator, and dust collection bag. Includes the original blade (recently sharpened), blade wrench, and instruction manual. This saw is 2 years old, well-maintained, and in excellent working condition. Great for homeowners, contractors, or anyone tackling a weekend project.
Tips:
- Use paragraphs—walls of text are hard to read
- Be honest about condition and any wear
- Mention if experience is required to operate
- Aim for 100-500 words
Step 2: Pricing
Set your rates and any security deposits.
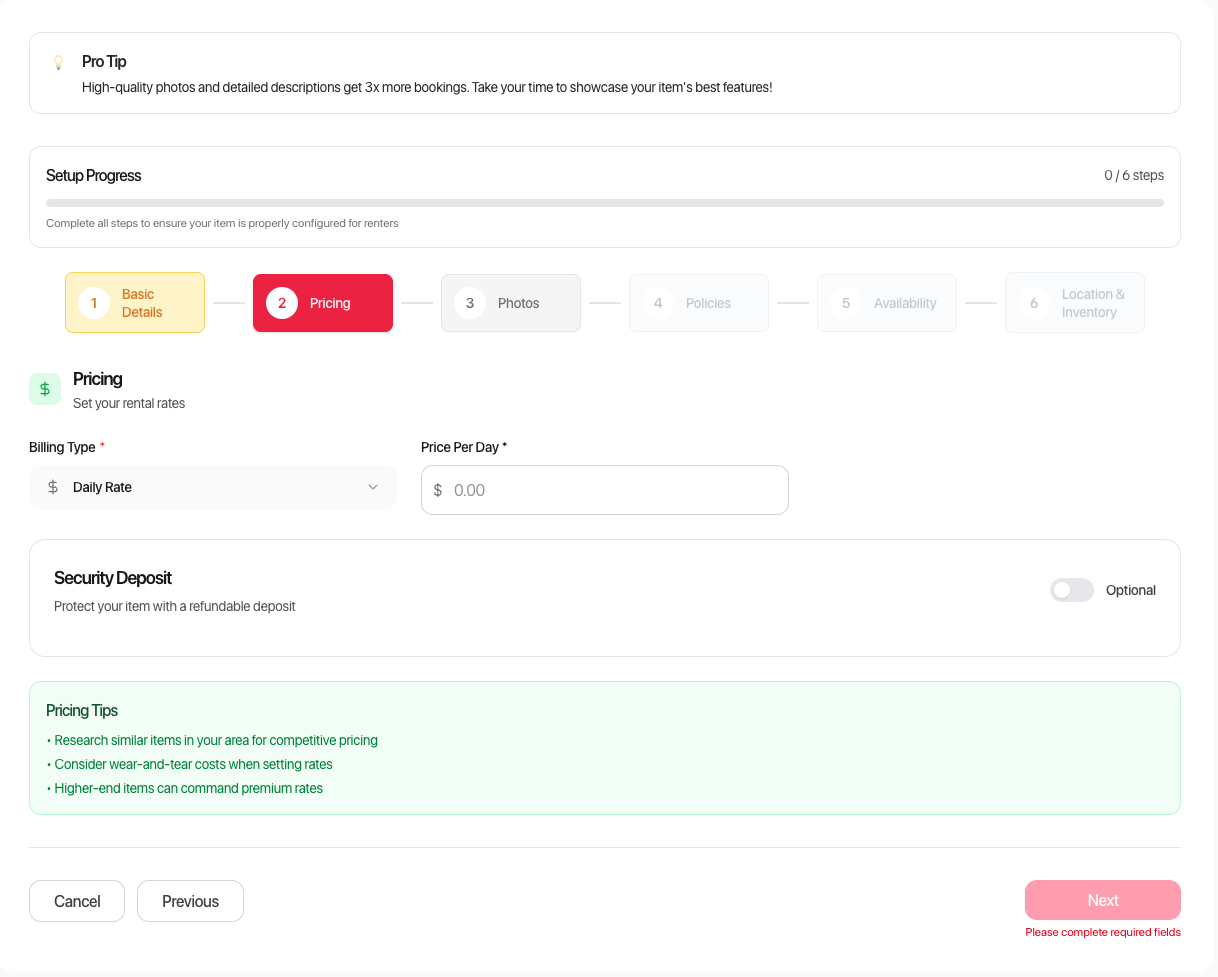
Billing Type
Choose how you want to charge:
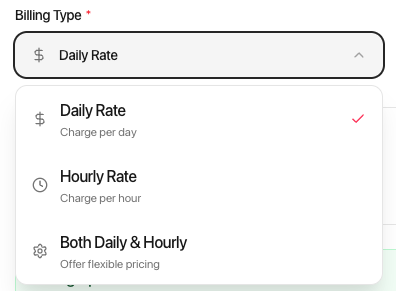
- Daily Rate – Best for items rented for full days or longer (tools, camping gear, party supplies)
- Hourly Rate – Best for items used for short periods (cameras, audio equipment, specialty tools)
- Both – Let renters choose; great for flexible items
Setting Your Rates
Minimum pricing: $25/day or $25/hour
How to price your items:
- Research similar rentals in your area
- Consider the item’s value—higher value items command higher rates
- Factor in wear and tear
- Price competitively but don’t undervalue your items
Pricing examples by category:
| Item Type | Daily Rate Range | Hourly Rate Range |
|---|---|---|
| Power Tools | $25-75 | $25-40 |
| Cameras & Lenses | $50-200 | $25-75 |
| Party Tents | $75-200 | N/A |
| Pressure Washers | $50-100 | $25-50 |
| Kayaks | $40-80 | $25-40 |
| DJ Equipment | $100-300 | $50-100 |
Minimum Rental Period
Set the shortest rental you’ll accept (1-30 days or 1-24 hours). This prevents micro-rentals that aren’t worth your time.
Tips:
- For pickup items, consider a 1-day minimum
- For delivery items, 1-2 day minimums help cover your time
- High-value items often have longer minimums
Security Deposit (Optional)
Protect yourself against damage or loss.
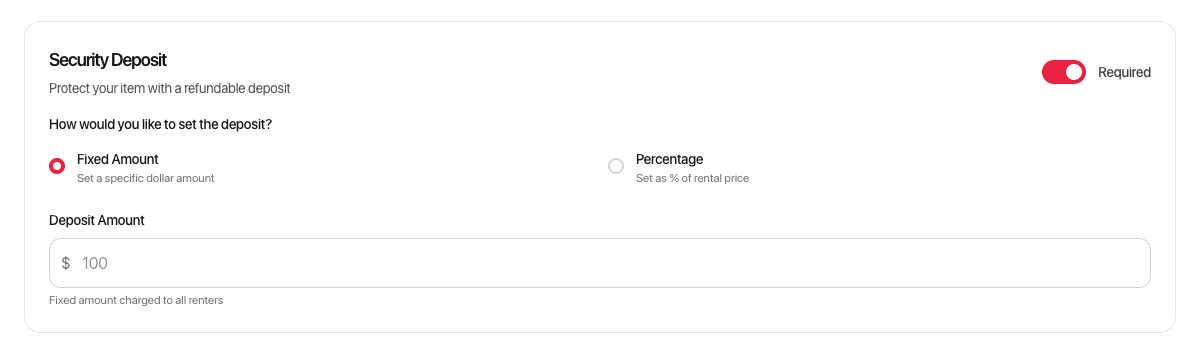
Two deposit options:
- Fixed Amount – Set a specific dollar amount ($0-$2,000)
- Percentage – Charge a percentage of the rental total (with optional $500 cap)
Deposit tips:
- Match deposit to replacement cost for valuable items
- Lower deposits encourage more bookings
- Consider the renter’s perspective—extremely high deposits can deter bookings
- You can always waive or adjust for repeat customers
Suggested deposits by item value:
| Item Value | Suggested Deposit |
|---|---|
| Under $100 | $25-50 or skip |
| $100-500 | $50-150 |
| $500-1,000 | $150-300 |
| $1,000+ | $300-500 |
Step 3: Photos
Great photos are the #1 factor in getting bookings. This step lets you showcase your item.
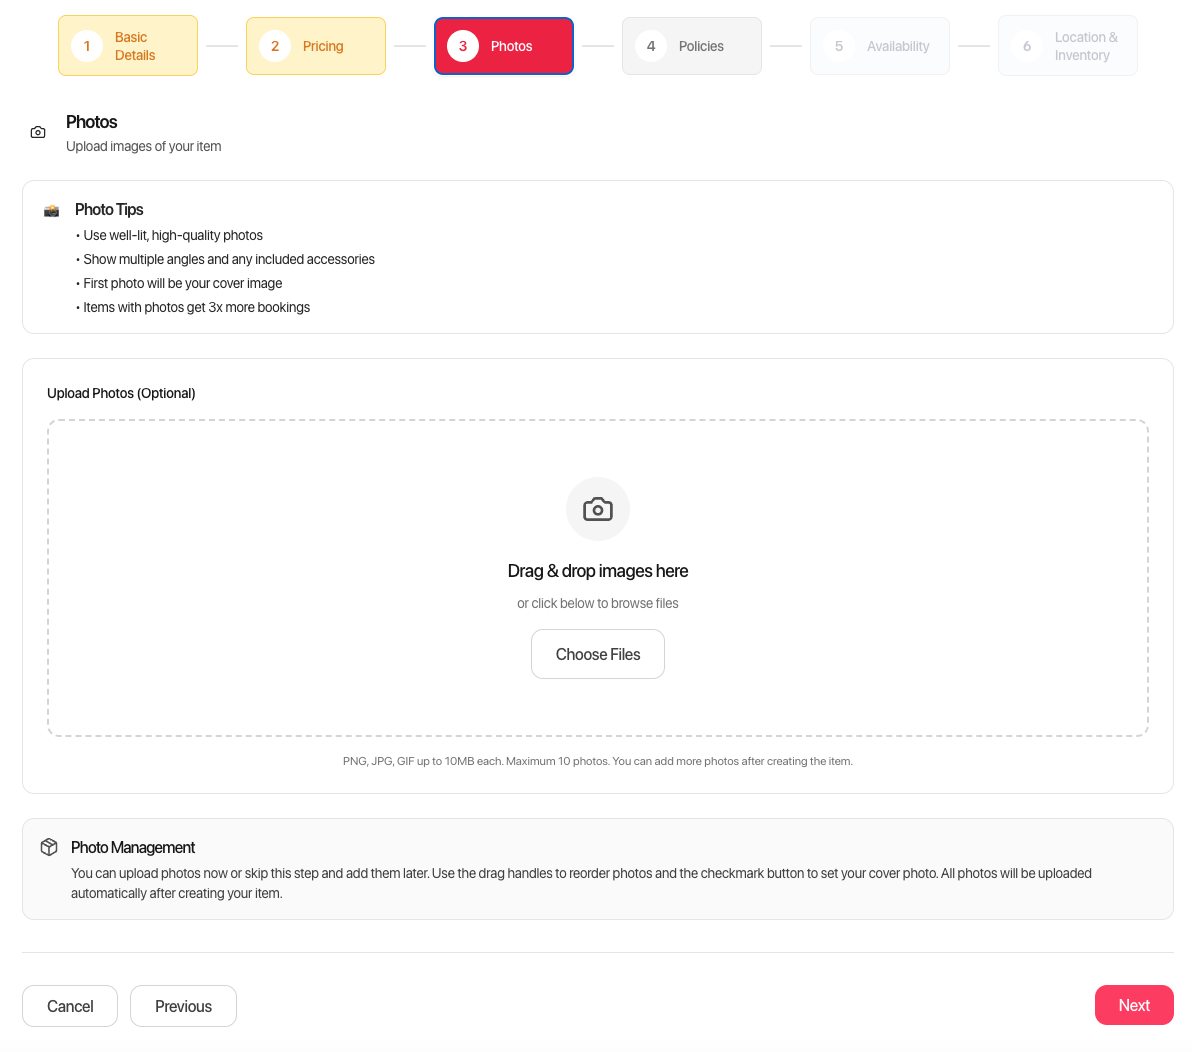
Photo Requirements
- Maximum 10 photos per listing
- Maximum 10MB per photo
- Supported formats: JPG, PNG, WebP, GIF
How to Take Great Listing Photos
Lighting:
- Use natural daylight when possible
- Avoid harsh shadows
- Don’t use flash—it washes out details
Backgrounds:
- Use clean, uncluttered backgrounds
- Solid colors work best
- Outdoor shots work great for larger items
What to photograph:
- Main shot – Full item, straight-on, well-lit
- Detail shots – Close-ups of key features
- Scale reference – Include something for size comparison
- Accessories – Show everything that’s included
- Condition shots – Document any existing wear (protects you and sets expectations)
Photo tips:
- Your first photo becomes the cover image (you can change this)
- Drag photos to reorder them
- Show the item in use if possible
- Clean your item before photographing
Uploading Photos
- Click “Choose Files” or drag and drop files
- Wait for upload to complete
- Drag to reorder
- Click the checkmark to set your cover photo
- Click the X to remove any photo
Step 4: Policies
Set clear expectations for renters about how your rentals work.
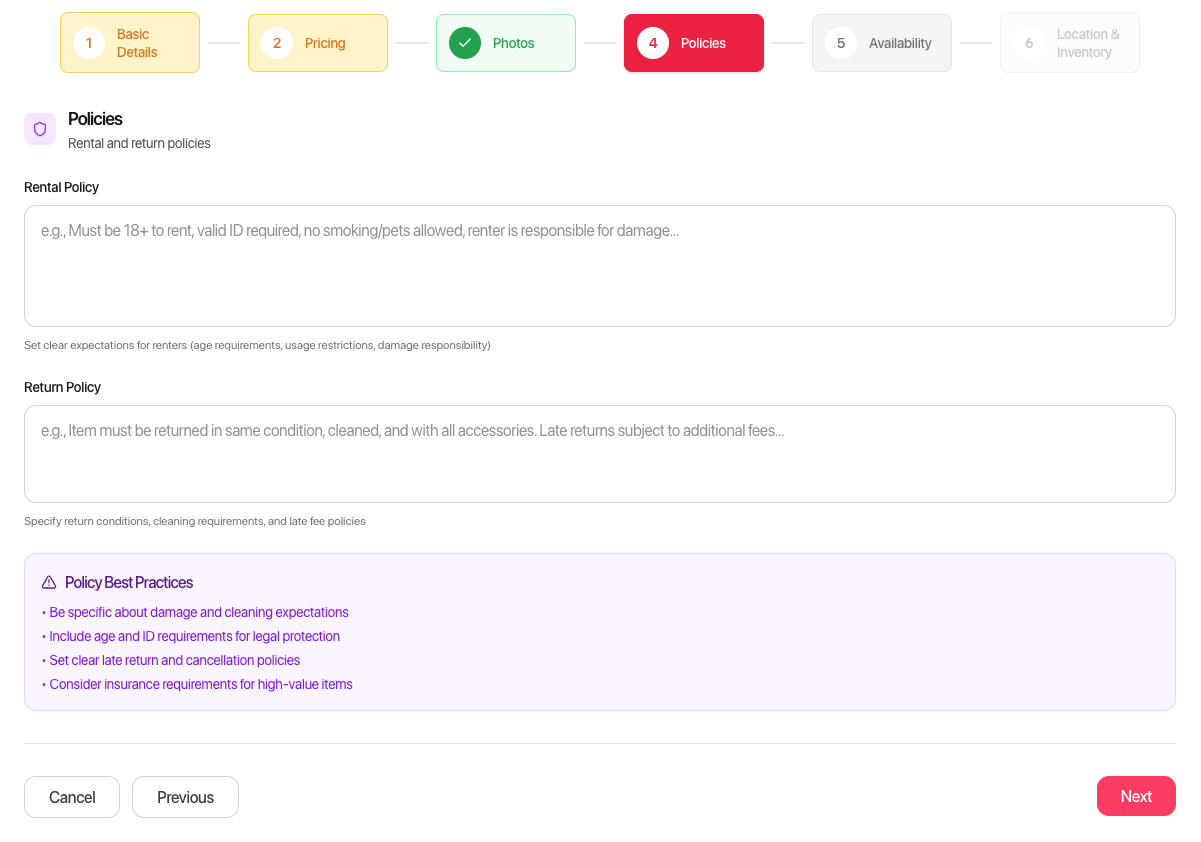
Rental Policy
Explain your rules and requirements. Consider including:
- ID or verification requirements
- Experience requirements for specialized equipment
- Age restrictions
- Prohibited uses
- Care instructions during the rental
- What happens if the item breaks during normal use
Example rental policy:
Renters must be 21+ with valid ID. This saw requires basic woodworking experience—please don’t book if you’ve never used a miter saw before. Keep the blade guard in place during operation. Clean sawdust from the motor vents after each use. Contact me immediately if any issues arise during your rental.
Return Policy
Describe your expectations for returns:
- Cleanliness requirements
- How/where to return
- Late return fees or policies
- Damage assessment process
Example return policy:
Please return the saw clean and free of sawdust. Pack it in the original case provided. Late returns will be charged an additional day’s rental. Minor wear from normal use is expected—just let me know if anything happens so we can discuss.
Tip: Clear policies prevent misunderstandings and protect both you and the renter.
Step 5: Availability
Control when your item can be rented.
Operating Hours
Set the hours you’re available for pickups and returns.
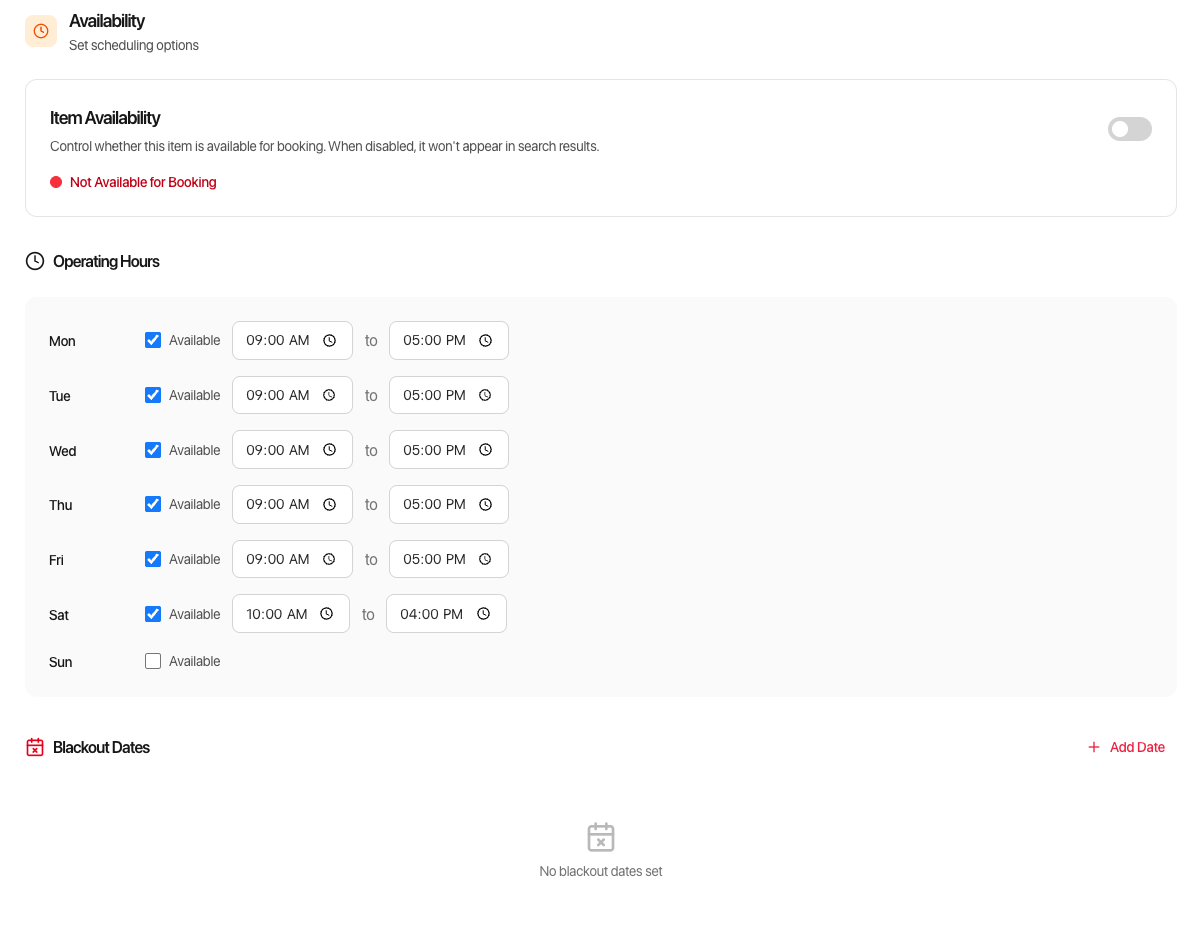
Options:
- 24/7 – Available anytime (good for items with lockbox or self-service pickup)
- Custom Hours – Set specific hours for each day
- Same hours daily – Apply one schedule to all days
Example schedule:
- Monday-Friday: 9:00 AM - 5:00 PM
- Saturday: 10:00 AM - 4:00 PM
- Sunday: Closed
Tips:
- Be realistic about your availability
- Consider your work schedule
- You can always adjust for specific bookings
Booking Settings & Delivery Options
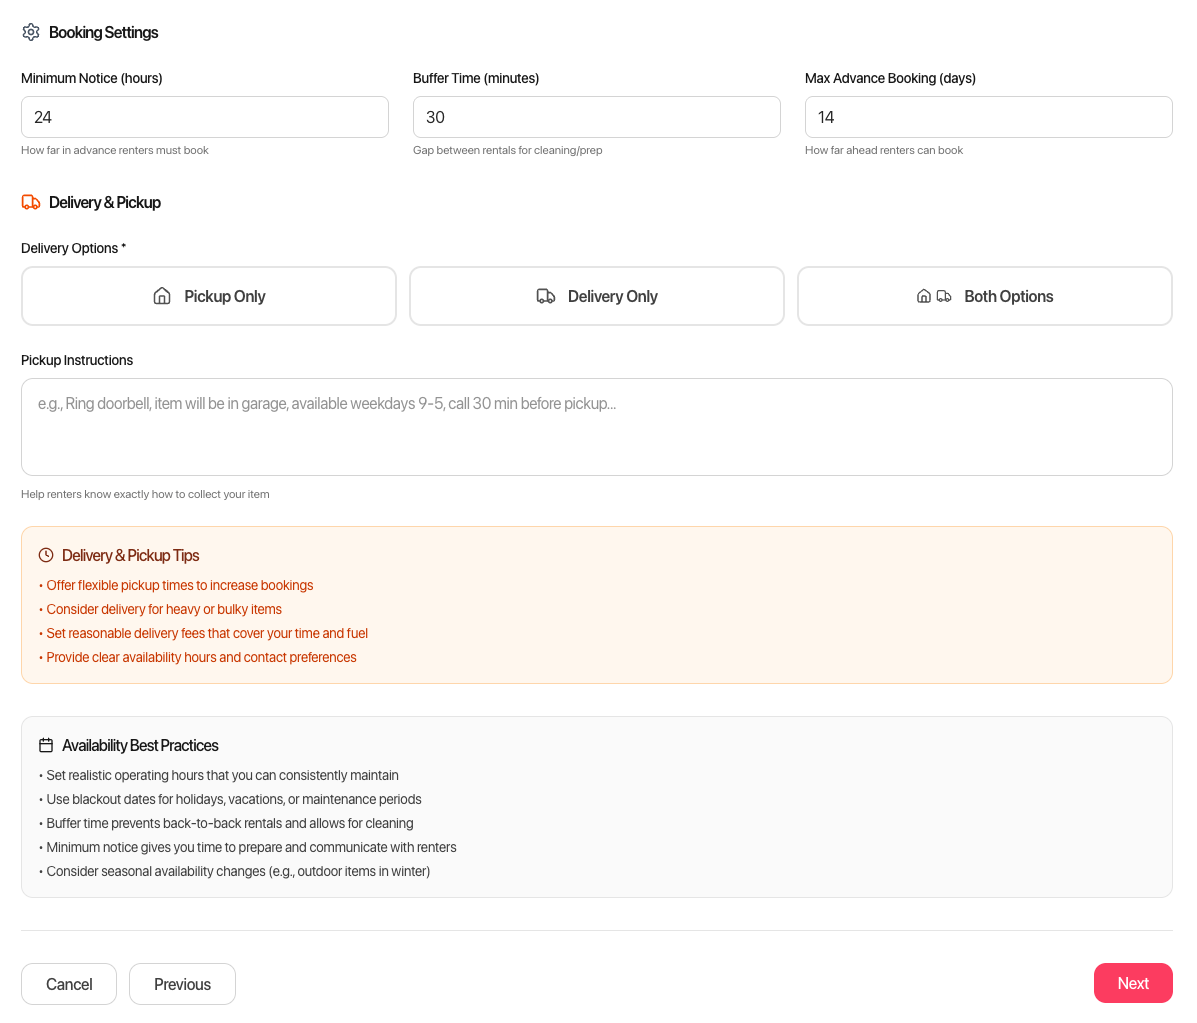
Booking Settings:
- Minimum Notice – How far in advance renters must book
- Buffer Time – Gap between rentals for cleaning/prep
- Max Advance Booking – How far ahead renters can book
Delivery Options:
Choose how renters get your item:
- Pickup Only – Renters come to you
- Delivery Only – You bring items to renters
- Both Options – Maximum flexibility
If offering delivery:
- Set your delivery radius (miles from your location)
- Set your delivery fee
- Consider free delivery for longer rentals
Blackout Dates
Block dates when your item isn’t available:
- Holidays
- Vacations
- Maintenance periods
- Personal use
Recurring blackouts: Set dates that repeat annually (like holidays) so you don’t have to re-enter them each year.
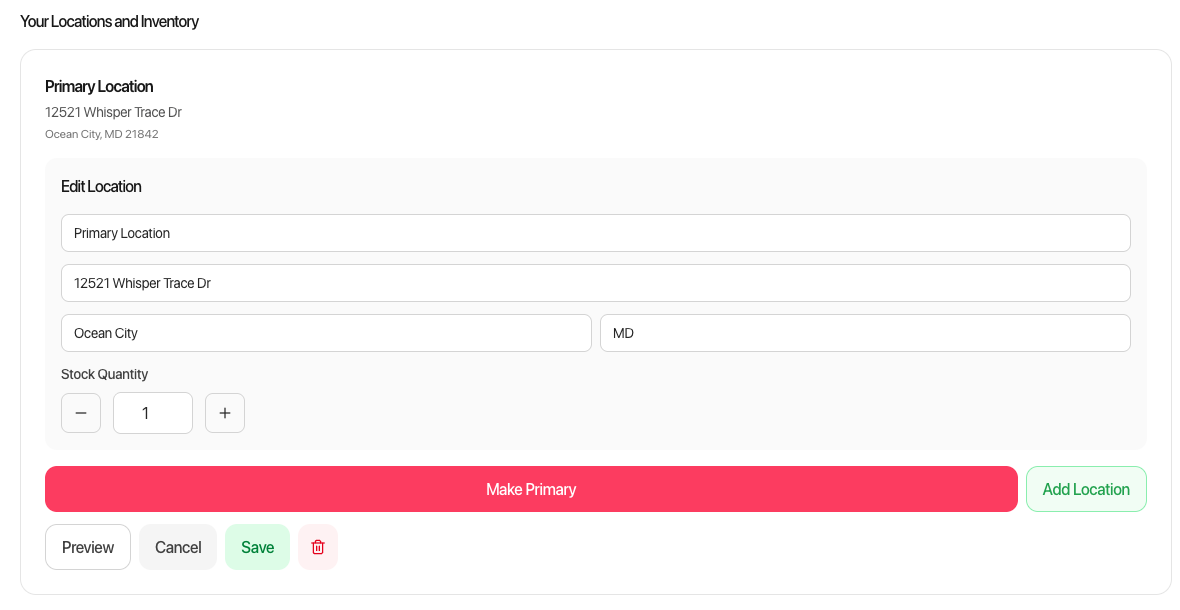
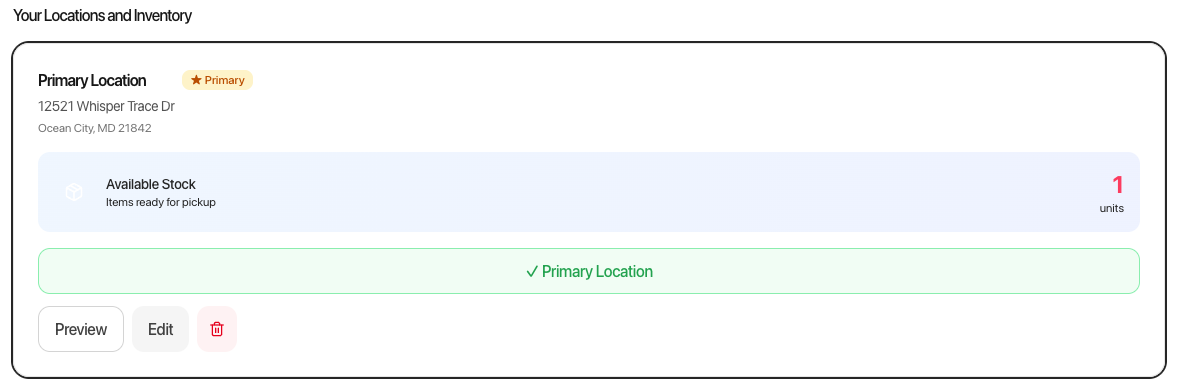
Step 6: Location & Inventory
Tell renters where to pick up and how many you have.
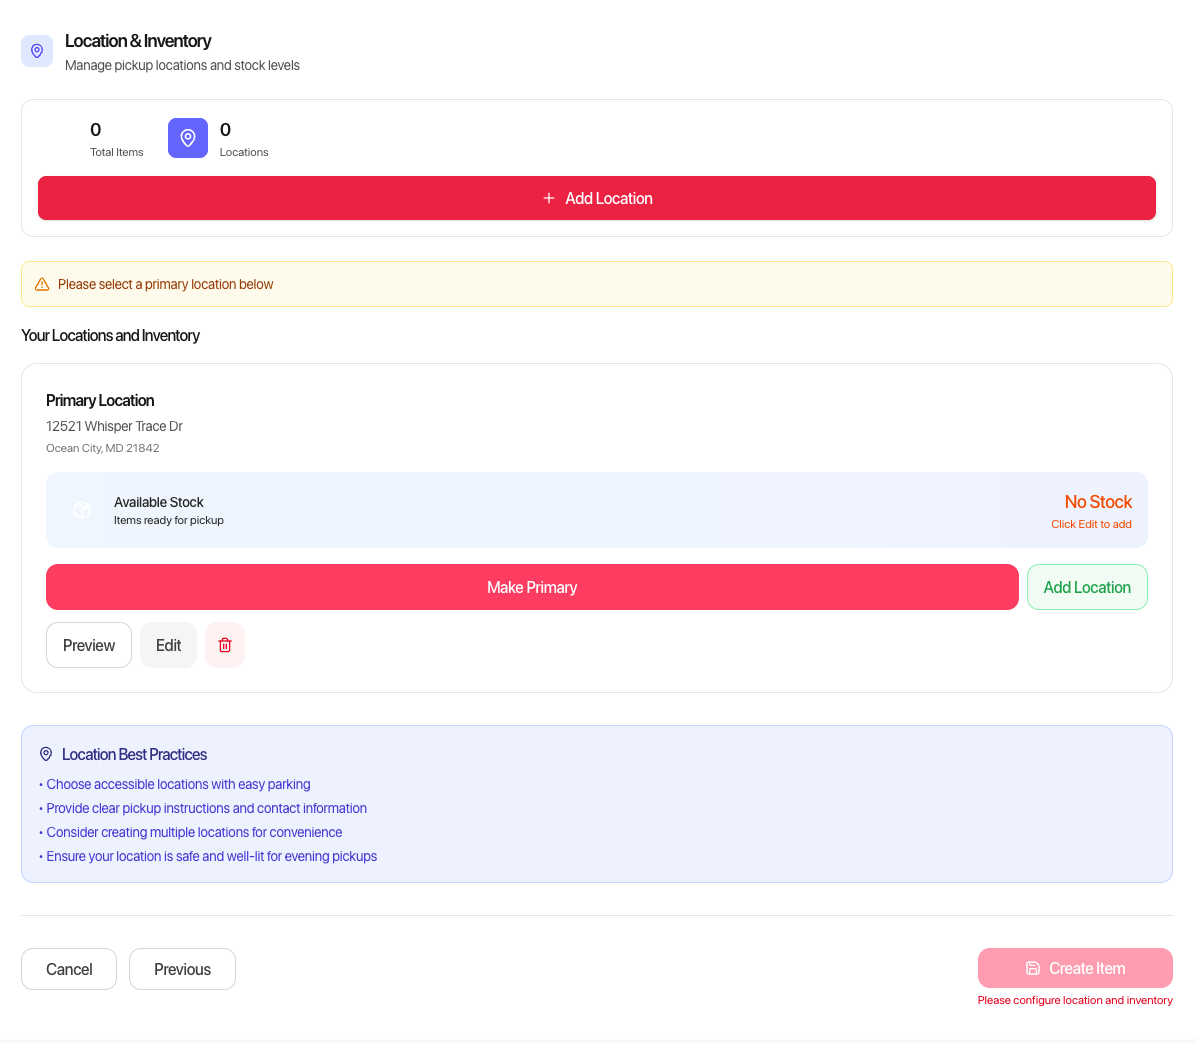
Adding Your Location
- Enter your address (where pickups/returns happen)
- Your location is verified and mapped
- Renters see your general area (exact address shared after booking)
Tips:
- Use an address where you can reliably meet renters
- Consider a public meeting spot for valuable items
- Business owners can use their shop address
Inventory Quantity
Enter how many of this item you have available at this location.
- Most owners have 1 of each item
- If you have multiples, enter the total quantity
- This allows multiple simultaneous bookings
Multiple Locations (Optional)
Have the same item at different locations? Add additional locations and set inventory for each.
Example: You have 3 pressure washers—2 at your home and 1 at your shop. Add both locations and set the quantities.
Publishing Your Listing
After completing all steps:
- Review your listing in the preview
- Check that all information is accurate
- Click Create Item or Publish Listing
Your item is now live and visible to renters in your area!
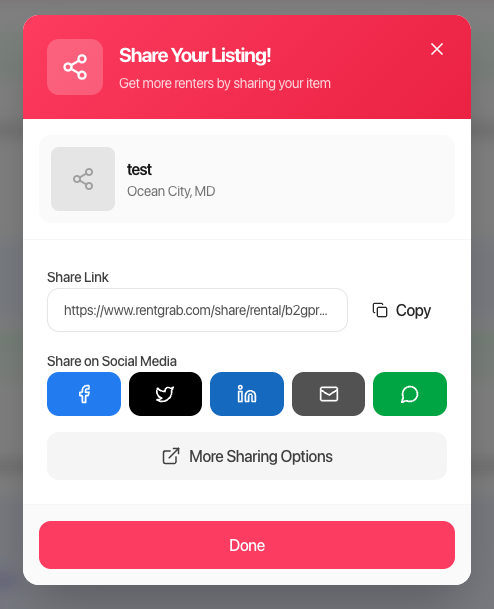
After publishing, you can share your listing on social media or copy the direct link to send to friends and neighbors.
Draft Mode
Not ready to publish? Your listing automatically saves as a draft. Come back anytime to finish and publish.
Managing Your Listings
Once published, you can manage all your items from the My Items dashboard.
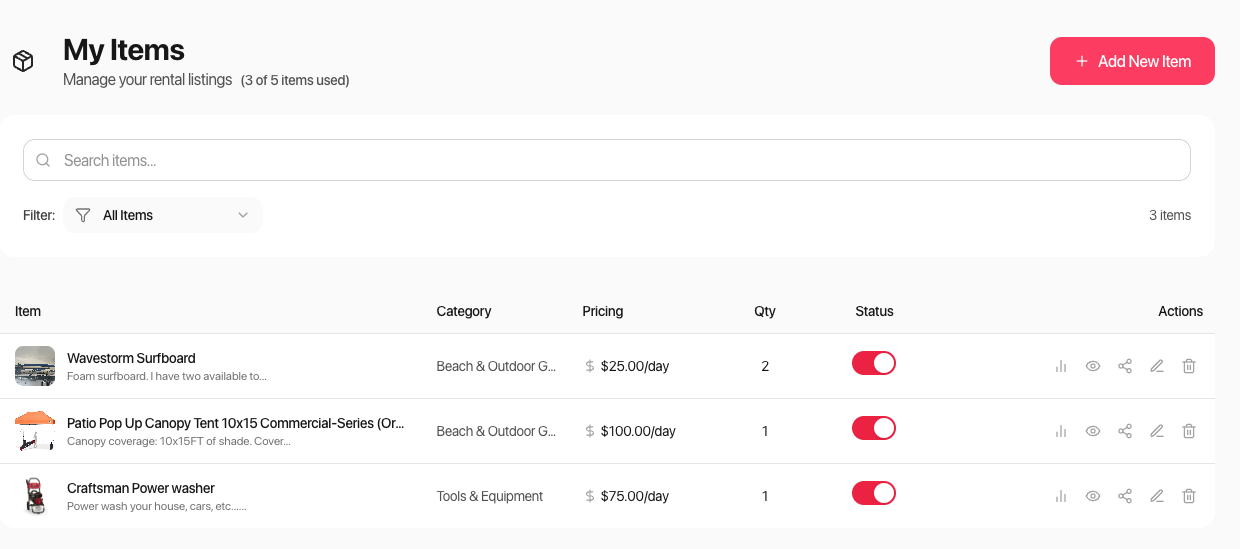
From here you can:
- View analytics for each item
- Preview your listing
- Share your listing
- Edit details, pricing, or availability
- Pause or delete listings
Tips for Getting More Bookings
Optimize Your Title and Description
- Use keywords renters search for
- Be specific about brand, model, and size
- Highlight what makes your item special
Price Competitively
- Check similar listings in your area
- Consider introductory pricing for new listings
- Offer discounts for longer rentals
Respond Quickly
- Fast responses lead to more bookings
- Enable notifications so you don’t miss requests
- Answer questions thoroughly
Keep Your Calendar Updated
- Block dates when unavailable
- Update quickly when plans change
- Nothing frustrates renters more than declined requests due to outdated availability
Maintain Your Items
- Clean items between rentals
- Address wear and tear promptly
- Update photos if item condition changes
Collect Reviews
- Great reviews build trust
- Follow up with renters after returns
- Provide excellent service to earn 5-star ratings
Common Questions
Can I edit my listing after publishing? Yes! Edit anytime from your owner dashboard. Changes go live immediately.
What if my item gets damaged? Security deposits help cover damage. Document condition with photos before and after each rental. RentGrab’s resolution process helps handle disputes.
How do I handle questions from renters? Respond through RentGrab’s messaging system. Keep all communication on the platform for your protection.
Can I remove a listing? Yes, you can unpublish or delete listings anytime from your dashboard.
What’s the minimum I can charge? $25/day or $25/hour minimum. This ensures quality listings and worthwhile transactions for everyone.
Ready to List?
Head to your owner dashboard, click Add New Item, and follow the wizard. Your first rental could be just hours away!
Tagged with:

W. Kevin Wolff
Founder & Owner of RentGrab
Kevin is the Founder and Owner of Rentgrab, a technology solutions company based in Ocean City, Maryland. With over 15 years of experience transforming businesses through innovative digital solutions, Kevin brings a unique blend of technical expertise (SharePoint, Power Platform, React), creative vision from his award-winning background as an Art Director, and entrepreneurial insight from founding multiple ventures including Rumble Fish Tackle & Lure. His diverse skill set spans full-stack development, digital marketing strategy, and business consulting, enabling him to bridge the gap between complex technology and tangible business outcomes. Through Rentgrab, Kevin leverages his enterprise-level experience architecting applications for thousands of users to deliver solutions that have saved organizations millions in operational costs.
Get the latest rental insights
Subscribe to our newsletter for equipment rental tips, industry news, and exclusive offers.
Subscribe and get:
- ✓ Weekly rental tips and strategies
- ✓ Owner success stories and inspiration
- ✓ Platform updates and new features
- ✓ Exclusive guides and resources
We respect your privacy. Unsubscribe at any time.
Related Articles
How to Add Your First Item to Rent on RentGrab
Step-by-step guide to creating your first rental listing on RentGrab, from basic details to publishing and getting booked.

How to Sign Up as a RentGrab Owner: Complete Guide
Step-by-step walkthrough of the RentGrab owner sign-up process, from creating your account to setting up Stripe payments.
What RentGrab Actually Is (And Why It Matters)
RentGrab is a neighborhood marketplace where you rent what you need and earn from what you own. Here's exactly how it works.